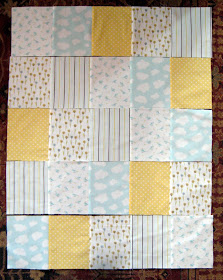
Sweet and Simple
If I can do it, pretty much anyone with basic sewing skills can! I've made 2 of these now, and both took about 2 hours.
If you're using 5 different fabrics, you'll need 1/3 yd (12" l) of each (assuming the fabric is 45" w). That will be more than enough so that you can trim them down to the exact size you need. For backing, you'll need 36" w x 50" l piece, but I'd get a little more than that and trim down. So let's say 1 1/2"yd (54 in"). You'll need the same amount in batting.
2. Lay out your swatches so that each pattern is represented only once in both the horizontal and vertical rows.
3. Starting in the top left and working your way across, stitch pieces together using a 1/4" seam allowance to create a horizontal strip. When finished, turn over and press the seams to the LEFT. Repeat to complete all the horizontal rows.

••••••• ~~~~ ••••••• ~~~~~ •••••••~~~~~ •••••••
5. On a flat surface lay out and smooth down a 38"w x 50"h piece of cotton batting. I used a thin organic cotton batting. On top of that, lay out and smooth down a 38"w x 50" cut of the backing fabric FACE UP. On top of that, lay out and smooth out the quilt topper FACE DOWN. Starting in the center of the quilt and working your way out, pin as shown in the image below.
5a. Stitch 1/4" from edge of the quilt topper beginning at the green dot and work your way around to the red dot. *be sure to back tack at the start and finish.* This will create a small opening, through which you can turn your quilt inside out.
5b. Before turning inside out, after stitching, trim the excess seams to be flush with the quilt topper (1/4" from seam).

••••••• ~~~~ ••••••• ~~~~~ •••••••~~~~~ •••••••
6. After turning the quilt inside out through the opening, flatten the seams with your fingers and press, making sure that from the top side, you do not see the backing fabric. Use a tool such as a bone folder or a pencil to push out the corners neatly. As you press, pin along the edges to keep your fold in place.

••••••• ~~~~ ••••••• ~~~~~ •••••••~~~~~ •••••••
7. When you come to the opening, you will need to press the edges in and pin closed. Hand stitch the opening so that it is closed.

••••••• ~~~~ ••••••• ~~~~~ •••••••~~~~~ •••••••
8. Lay out the quilt again and smooth it out so that all layers are evenly distributed. Starting in center and working outwards, pin through all thicknesses at every seam intersection as shown below.

••••••• ~~~~ ••••••• ~~~~~ •••••••~~~~~ •••••••
9. Topstitch 1/4" along the entire edge of the quilt. Topstitch 1/8" to the RIGHT of each VERTICAL seam. Finally, topstitch 1/8" BELOW each HORIZONTAL seam.
10. Voila! You're finished!


I've been wanting to do a quilt like this...does this quilt come out as a certain 'size?' -- is this considered a lapquilt?
ReplyDeleteI just found this tutorial and I have never quilted. I thought this would be a good place to start. Did you ever find out the size and did you make it? Thanks, I am going to be a grandma in May and I want to make a quilt for my grandson.
DeleteThank you for the great tutorial. I have only had my sewing machine about 3 weeks. This is my first quilt project and the simple steps have made it easy for a beginner to follow.
ReplyDeleteI'm excited to try this! Need lots of warm blankeys up here in Montana. :)
ReplyDeleteHave you tried washing this? Does it do ok in the machine - the batting doesn't roll up inside?
ReplyDeleteThanks! I love the fabric you chose!
Use old blankets for battng. They won't bunch or shift and you can usually find the cheap at yard sales and thrift stores.
ReplyDeleteUsing the measurements given(5 squares at 10" each minus 3" for seams by 5 squares wide times 7.5" each minus 3" for seams )makes it 47" long 34.5" (approximately). Thats a good baby sized quilt. Most baby quilts are 42.5" by 54.5" but that is very big.
ReplyDeleteLove it thank you! Perfect for charity use too.
ReplyDeleteI'm enjoying making this for my nephew's new baby boy, Benjamin. THANK YOU!!
ReplyDeleteI've made three of these so far. It's such a great pattern! Thanks for sharing.
ReplyDelete